> For the complete documentation index, see [llms.txt](https://video-copilot.gitbook.io/element2/llms.txt). Markdown versions of documentation pages are available by appending `.md` to page URLs; this page is available as [Markdown](https://video-copilot.gitbook.io/element2/texturing-and-materials/surface-and-uv-mapping.md).
# Surface & UV Mapping
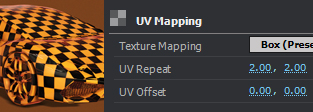
## TEXTURE MAPPING
This adjusts how your texture wraps around your object. There are Box, Sphere, Plane, and per Polygon mapping options under the dropdown.
### **UV mapping vs. Box**
For example, to the left is the difference between the default UV mapping and the Box (Preserve Aspect Ratio) option. The checkerboards are used to show the difference in which they wrap.
***
#### **UV Repeat**
Adjust how many times the the material will repeat. This will tile the material.
#### **UV Offset**
Shifts the position of the texture up and down, or left and right.
## AUTO NORMALS
This auto-calculates the normals for shading based on a mesh’s geometry. This can be used as a solution to generate smoothing if your model was not able be exported with smoothing groups or normals. This may prove helpful in many scenarios, although it is more efficient to have the normals and smoothing fixed before importing into Element.
### **Edge Threshold**
Adjusts the angle at which auto normals will generate a sharp edge.
### **UV Repeat Invert Normals**
Inverts all polygon normals. For more info and uses for Auto Normals and Edge Threshold see [3D Object Troubleshooting](https://www.videocopilot.net/help/element2/help_files_v2/importing_3d_objects_into_element_3d/3d_object_troubleshooting/) and [Exporting 3D Objects for Element 3D](https://www.videocopilot.net/help/element2/help_files_v2/importing_3d_objects_into_element_3d/exporting_3d_objects_for_element_3d/).
## SUBDIVISION LEVEL
**Subdivision Level** will multiply the amount of polygons on an object, this also helps when using the deform options and you want a smoother edge. Changing the **Edge Mode** dropdown to **Connected** will connect unconnected geometry, this helps when using the deform options as well. **Optimize Mesh** will combine geometry into larger triangles to decrease polygon count.
.jpg)
.jpg)
.jpg)
.jpg)